Monday, May 30, 2011

Take a Walk on Your Wild Side

Since my last eye look was a natural one, I thought I'd mix it up a bit.  Although this look is inspired by something in nature, I wouldn't quite call it natural.  I wore this leopard print eye to school the other day and had so many compliments and questions on how I did it, so here it is.  All you need is......

1) primer or base
2) BH Cosmetics Standard Shimmer Palette (or a gold and a brown eye shadow)
3) liquid eye liner
4) eye shadow brush

Step 1: Apply the base all over the lid.

(Since there are no names or numbers on the palette, I decided to number them from left to right from the top, going downward.  So, the lightest color <top left corner> is #1 and the darkest <bottom right corner> is #88.)

Step 2: Pat #46 on the lid. (When you pat the shadow on rather than brushing it, you will get much better color pay off.)

Step 3: Apply #54 over the gold on the corners and up a little bit further where the print is going to go.

Step 4: Take your liquid liner for the print and start mimicking the spot of a leopard.  Draw small C's and wavy O's, dots and lines randomly to look like a leopard.
 Go crazy with this wild look and, as always, make it your own!

Always,
Britta

Thursday, May 26, 2011

Natural Day-To-Day Eye Look

If you're not into wearing lots of color every day, here is a super natural look that is practical for whenever, wherever.  All you need is.....

 1) primer or base
 2) BH Cosmetics 88 Color Standard Shimmer Palette
 3) eyeshadow brush

(Since there are no names or numbers on the palette, I decided to number them from left to right from the top, going downward.  So, the lightest color <top left corner> is #1 and the darkest <bottom right corner> is #88.)

Step 1: Apply a base all over your lid.

Step 2: Apply #32 all over the lid, up to the crease.

Step 3: On the outer corners of your eyes, use #54. (You just need to go 1/4-1/3 of the way into your lid.)

Step 4: Blend the two colors together using #32 again.

Easy peasy! Right? If you don't have this exact palette, you can mimic the colors with whatever you have.  Have fun and make it your own!

Always,
Britta

Wednesday, May 25, 2011

Scrub-A-Dub-Dub

Summer is coming and we all know what accompanies this season; dry, flaky skin.  This lemon lavender  exfoliating body scrub is easy to make and works really well in getting all the dead skin off.  You can use your hands or a washcloth to rub on your skin in the shower.  It leaves your skin feeling smooth and rejuvenated.  All you need is.....

1) sugar
2) a lemon
3) lavender (optional)

Step 1: In a bowl, put 1/8-1/4 cup sugar depending on how much you're going to use.

Step 2: Add a little bit of lemon juice. (Just enough to make all of the sugar clumped.
Step 3: Add some lavender for a sweet smell.
Use this as a body scrub and you will find smooth results instantly!

Always,
Britta

Monday, May 23, 2011

Xsparkage Inspired Eye Look

Recently, I've been watching some videos by Xsparkage.  She has her own blog and youtube.  Her most recent look inspired me to do something fun and colorful and not something you would wear everyday.  (Well I wouldn't at least.)  She was inspired by the new Pirates of the Caribbean movie for this look.  Here is what I attempted on my mom (a.k.a my willing guinea pig).  Keep in mind, I used different products and altered how I did it, making it my own.

What you need is.....
1) BH Cosmetics 88 Color Standard Shimmer Palette
2) primer or base
3) NYX Jumbo Eye Pencil in Purple
4) basic black eyeliner pencil
5) liquid eyeliner
6) mascara

Step 1: Apply a primer or base all over the lid.

Step 2: (Since there are no names or numbers on the palette, I decided to number them from left to right from the top, going downward.  So, the lightest color <top left corner> is #1 and the darkest <bottom right corner> is #88.)  Take #50 and apply it all over the lid.

 Step 3: Apply #26 to the inner and outer corners of the lid and blend slightly.

Step 4: Using #81, go into the crease.

Step 5: From the crease, brush #27 up slightly, blending with the top colors.

Step 6: On the bottom and top lash line, apply NYX Jumbo Eye Pencil in Purple.

Step 7: Use a black eyeliner on the bottom waterline.

Step 8: Go over the purple eyeliner with #72 for more of a smokey effect.

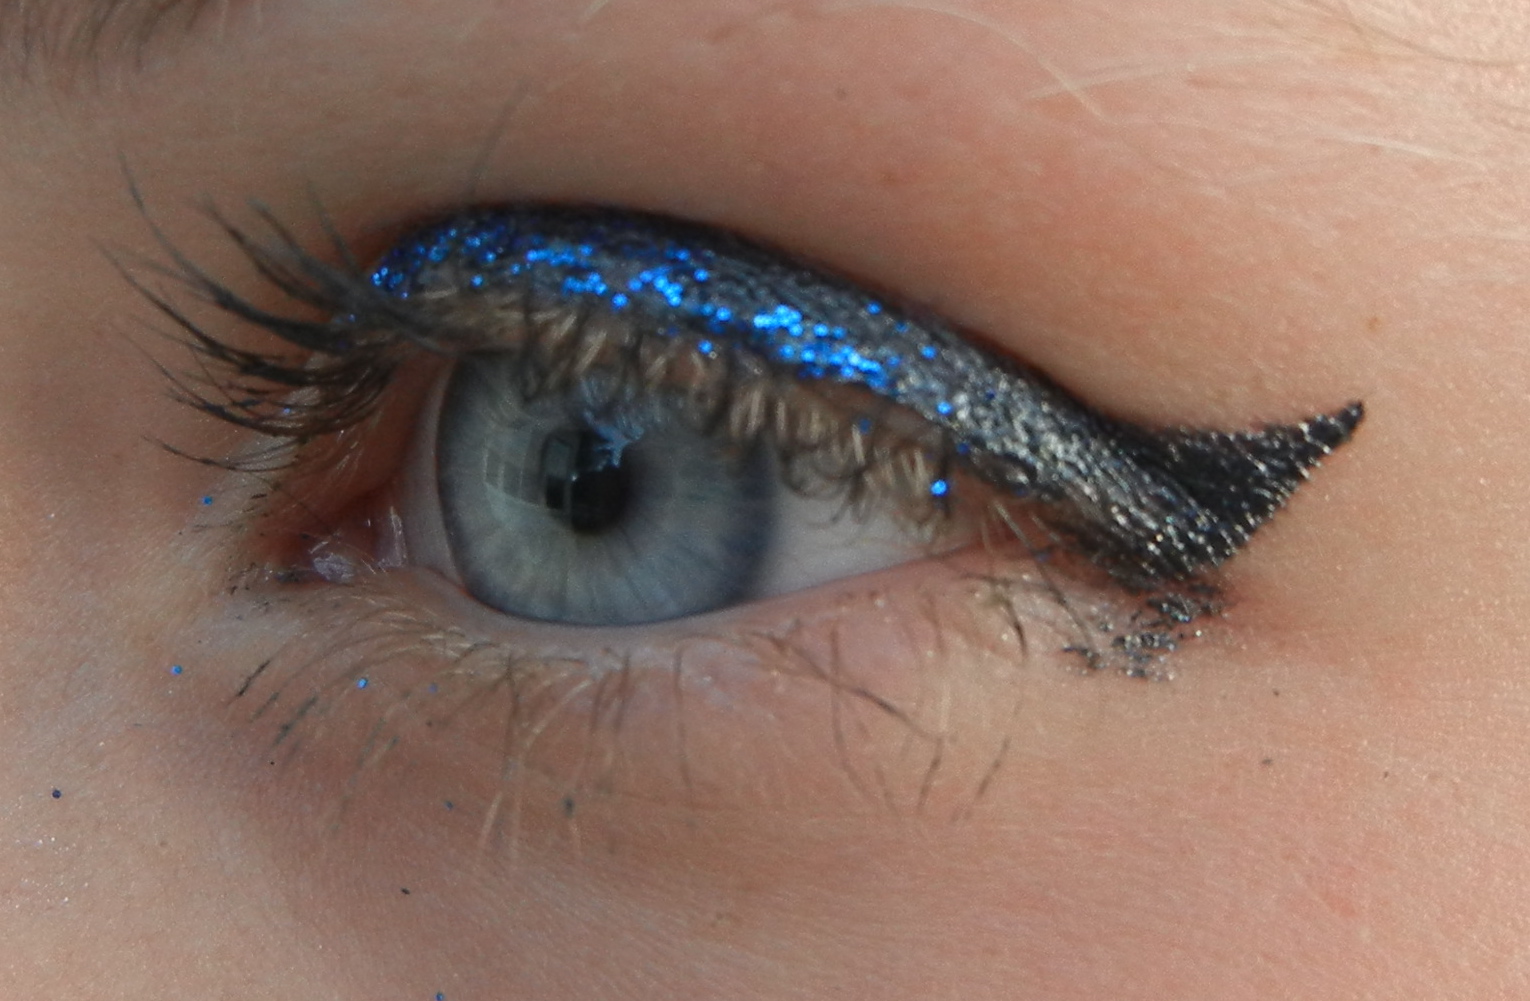
Step 9: From the upper lash line, going halfway into the purple, apply a thin line of liquid liner.

Step 10: Use #12 as an eyebrow highlight.  Place it at the highest point under your eyebrow and brush it out to the rest of the bottom of your eyebrow from there.

Step 11: Apply some mascara and you're ready to go for a night time/ smokey mermaid/ sea life type look!
Here is a link to my inspiration:http://www.youtube.com/user/xsparkage?blend=1&ob=5#p/u/0/_fEzjYvQ5Q4

Have fun with this and make it your own just like I did!

Always,
Britta

Thursday, May 19, 2011

Friday Night Eye Look

Using liquid eyeliner, you can create so many different looks.  My favorite, though, is this fun cat eye.  Adding glitter to anything will make it more of a night look.  Weekends are all about having fun and being daring.  This look definitely fits that description.  The only products you need are.....

1) any liquid liner
2) Sally Girl Sparkle Effects Gel Adhesive for Glitter which you can get here: http://www.sallybeauty.com/facial-Glitter/SBS-388609,default,pd.html
3) Sally Girl Sparkle Effects which you can get here: http://www.sallybeauty.com/facial-Glitter/SALGRL2,default,pd.html?cm_vc=SEARCH (Each of the Sally Girl products are normally $0.99, but right now are on sale for $0.83.)

Step 1: Take the liquid liner and create a line up as far as you want from the corner of the water line, following the line upwards.

Step 2: From the top corner or the line you just made, connect a line across to the middle of your lid and fill it in.

Step 3: From the inner corner of your eye, draw a line across the upper lash line, merging with the triangle you just made.

Step 4: With a Q-Tip, apply the gel adhesive where you want the glitter.

Step 5: Dab on the glitter. (I just used my finger.)

You can clean up the lines and make them sharper with some eye makeup remover and a Q-Tip.
If you do get a lot of fallout from the glitter, all you need to do is pick it up with some tape!


Have fun with this look and make it your own if you want!

Always,
Britta

Sunday, May 15, 2011

Smoothies: Natural Energy Boosts

Being the fruit lover that I am, I love making smoothies.  They are perfect for a post exercise snack or even breakfast.  The coldness of it tends to wake me up along with the sweet fruit.  I feel healthy and full of energy after making one of these icy drinks.  If you have the right fruit, you won't even need to add any extra sugar whatsoever.  All you need is.....

1) about a cup and a half of fruit  (You can use more or less.)
2) five ice cubes
3) 4 spoon fulls of raspberry yogurt
4) 1/4 cup fruit juice
5) a blender

With smoothies, you can go crazy with fruits and juices!  Since I love strawberries so much, I like to put a lot of them in my smoothies.  If you have a favorite fruit, put more of that in that any of the others!  Go insane!  You never really need to follow a strict recipe when making smoothies which is another thing I love about them.

Step 1: WASH YOUR FRUIT! (It's really important to rinse off your fruit before eating them to prevent consuming any pesticides, dirt, or any other not-so-delicious stuff.)

Step 2: Chop your fruit up.  The more you do this, the quicker the blending goes and the more it will help out your blender. (I used strawberries, blueberries, apple, and pear.)

Step 3: Add your juice, yogurt, and ice with the fruit into the blender. (For juice, I used Simply Lemonade.)

Step 4: BLEND!

Smoothies wake up your senses, making you feel fresh and beautiful on the inside.  Once you feel better on the inside, it will start to show in your face, making you feel gorgeous on the outside as well.

Always,
Britta


Saturday, May 14, 2011

BH Cosmetics 88 Shimmer Palette

I have been noticing that a lot of you guys have been interested in my eye looks and I felt like I was running out of materials to use for some fresh ideas.  One of my inspirations, Nikkie Tutorials, uses a palette from BH Cosmetics frequently.  Even though her palette has more than 88 colors, she is able to create many different looks with this palette.  Also, in some of my comments, you guys have asked if I use a primer or a base before I put any eye makeup on.  I had never used one before, but thought I would go on ahead and buy one along with the 88 Color Standard Shimmer Palette and an eyeshadow brush.  I ended up paying about $40 for all three of the items plus tax and shipping. (The palette and the brush were on sale and I did get a Mother's Day discount too, so the price may be slightly different now.)  I ordered it in the evening and it was sent out the next day, which I was really happy about.  Once it came, I opened the box and was instantly in love.  The colors are gorgeous, the brush was soft (but not too soft), and the primer went on like butter. It really did prevent creasing on the eyeshadow and gave more of a color payoff.

There are many different palettes that BH Cosmetics offers.  The reason why I bought the 88 Color Standard Shimmer Palette was because I knew I didn't need any more colors than that.  88 is such a big number anyway, I felt like any more would be overwhelming for me.  And I got the shimmer version because I am more of a shimmer type girl.  I use shimmers more than mattes.  If that's not the case for you and you are interested in buying a palette, then get the matte.  Whatever tickles you pink.  The only thing I did notice about the 88 Shimmer Palette was that I didn't notice a true white for highlighting the brow bone.  There are a few very close, but not completely white.  That isn't an issue for me just because my skin is a bit darker and I tend to use light peachy colors to highlight my brow bone, but if your skin is a lot lighter than mine, you would probably want a pure white.  Again, there is one color that is super close, but not completely and I think that it would work fine.  But if you're picky with highlight colors, that is just something that you may want to consider.

I completely adore all of these products!  Here is a link to all of them:
Palette:
 http://www.bhcosmetics.com/products/88-Color-Shimmer-Eyeshadow-Palette/
Primer:
 http://www.bhcosmetics.com/products/Eye-and-Lip-Primer/
Brush: 
http://www.bhcosmetics.com/products/Angled-Shadow-Brush/


Follow my blog or just keep checking in for more eye looks, reviews, beauty and fashion tips, and more!  Emphasis on the more!

Always,
Britta

Wednesday, May 11, 2011

L'Oreal One Sweep Eyeshadow

When I first saw the ad for the new One Sweep Eyeshadow from L'Oreal, my first thought was that an eye look like that could not possibly come from that weirdly shaped brush and three joined strips of shadow.  Then, I started thinking that it was the perfect thing to blog about.  If I got it and it didn't work, I could let you all know that it was a piece of junk, but if it actually did work, I could post a lot of different looks from it.  So, I went ahead and bought it.  I think I ended up paying around $10 for it which I wasn't thrilled about.  If it didn't work, I would've wasted $10 I could've spent on a new lip stick (If anyone has a favorite lipstick, please, please, please let me know.) or even an eyeliner or a new top from Forever 21.  I rushed home from CVS and tried it on.  I was a little disappointed when I realized it didn't really look like the ad.  But the more I stared at it, the more I started to like the look.  Sure, it wasn't as gorgeous as the ad, but what makeup ever is?  The eyeshadow didn't go on too thick or too thin either.  The amount and color was perfect.  It wasn't to sparkly or anything.  It had a really nice, subtle shimmer, perfect for an everyday natural look.  I took pictures of it on my friend today and even though I got the eyeshadow in Natural For Brown Eyes, it looked amazing on her gorgeous teal-y green ones.  The One Sweep made her eyes pop like crazy.  I did add a super thin line of eyeliner from Cargo in Bronze just for an even smokier look.  If you're looking for a really subtle, natural look (with a bit of shimmer), I definitely recommend the L'Oreal One Sweep Eyeshadow.   

On my friend.  (Aren't her eyes absolutely gorgeous?!)
The eyeliner I used. (Bronze from Cargo.)
Always,
Britta

Tuesday, May 10, 2011

NYX Jumbo Eye Pencil Review

It seems like a lot of you really liked the green eyed look (and I did tell you I would) so here is a review on the pencil I used.  I bought these pencils recently online at NYX in Rocky Mountain Green (which was in the green eyed look), Baby Blue, and my favorite, Purple!  Whether it's makeup, clothing, or nail polish, if it's purple it's probably my fave!  Not all the time but the majority of it, yes.  I'm a purple-holic!  What can I say?  Anyway, I have been really loving these pencils.  I use them mostly just as liners, but you can use them all over the lid.  They glide on really smooth and are super light weight.  I can't even tell when I'm wearing them when I do.  The Rocky Mountain Green is like a true green with a gold tint to it, which is great with hazel eyes.  The Baby Blue is a frosty light blue with a shimmer and almost metallic look when worn.  And last but definitely not least, the purple is more of a bluey-purple than a plain purple.  It also has a lighter blue shimmer to it, if that makes sense.

Even though I am really loving these right now, I do have to admit there are a couple flaws to it.  First off, they don't stay on super well and easily slide off with a rub which isn't the greatest.  Also, when worn on the bottom lash line, they can end up looking like flakes of mascara.  I still haven't figured out how to make it not look like that yet, but when (if) I do, I will let you all know.  Other than that, I love these pencils and recommend them to anyone who eye rubbing is not an issue for!


From left to right; Rocky Mountain Green, Baby Blue, Purple

Always,
Britta

Monday, May 9, 2011

My 'Adele Inspired Look' Inspired by Nikkie

In honor of my last post, I thought I would show you a look that I learned from one of my inspirations I talked about.  This Adele Inspired Look is something that I found on a recent Youtube video of hers.  It's really easy once you master the eyeliner part.  All you need is Expensive Pink by MAC, a light brown eyeshadow for the crease, (She uses Cork by MAC) liquid eyeliner, and a nude lipstick.  For the brown eyeshadow, I used a random one from an e.l.f. palette I had.  I just recently bought NYX's Studio Liquid Liner in Extreme Smokey Gray which I can say after trying out out on my friend, my sister, and myself, I do not recommend.  On all three of us, it burned our lids when we applied it.  It was terrible, so I'm still searching for a good, appropriately priced liquid liner.  If anyone has any suggestions, please let me know.  For the lips, I used Revlon's Nude Attitude lipstick and a Clinique lipgloss I've had forever in Nudey.  I've had it so long I don't even know if they still make it.  Any nude or light lipgloss will work.

Watch this video to see how she applies everything.  As you can see, I did alter what I used and slightly how I did it, but the overall look either way is stunning.
http://www.youtube.com/watch?v=-wPMFskbx3A

Here's what I attempted on my sister:


Can't forget the lips:


I love this look and would totally wear it on myself!  Go watch the video and try it out!

-Britta

Sunday, May 8, 2011

My Inspirations

Today I thought I would share with you the two figures that inspired me to become so interested in makeup and starting my own blog.  They are both hilarious and have an amazing sense of humor which is something that I look for a lot in role models. They aren't afraid to be who they are.  I look at my computer screen as I watch their tutorials and reviews and think, Wow.  They aren't holding back from their true personalities at all.  Most importantly, their tutorials are so informative and make sense to a beginner (like myself).  The first one who really sparked my interest in makeup was Cora or Vintage or Tacky.  She is really daring and creative with her eye looks and uses lots of bold colors.  It was while I was watching her on Youtube that I found my second inspiration, Nikkie or Nikkie Tutorials.  Her looks are less colorful in a way and more smokey and a lot are the type of makeup I would wear every day. Others are more geared more toward a party type look or based off of an inspiration i.e. Lady Gaga and Adele.  She makes me laugh every time I watch her.  Her personality is just so lovable and funny in almost a quirky way.  These two women have inspired me and hopefully they will to you too.

I want to know who your inspirations are!  Let me know!
Here are links to both of them:
www.vintageortacky.com
www.nikkietutorials.com
or
www.youtube.com/vintageortacky
www.youtube.com/nikkietutorials
-Britta

Spring Green Eye Look

To end off this week of spring trends, I thought I would do a green eyed look on my friend.  You can wear this to a party or even in the day.  It looks best on green or hazel eyes to make them pop, but it will still look fantabulous on anyone.  I used my Jumbo Eye Pencil from NYX in Rocky Mountain Green that I got along with a couple others, (I will be posting a review on those soon.), L'Oreal HIP High Intensity Pigments in Rebel, a white or light peachy eyeshadow, and Covergirl's Lash Blast Fusion mascara.

 Step 1: With an eyeshadow brush (or I prefer using my finger), dab the pigment all over the lid.

Step 2: Using a small brush or even your finger, dab an eyeshadow that is slightly lighter than your skin tone to the highest arch in your brow, then spreading it from there across the rest of the bottom of your eyebrow.
 Step 3: Apply the eye pencil on the upper lash line as you would any other eye liner.

Step 4: Apply your mascara.  Whichever one works for you is totally fine.


Hope everyone is having an A-mazing Mother's Day!
-Britta

Saturday, May 7, 2011

Project Frosted Cupcakes

Hey it's Britta and I've teamed up with one of my BFFs to talk about the real meaning of beauty.  A lot of girls feel like they need to look a certain way, like models they see in magazines, so they cake on foundation and eyeliner and end up looking hidden under a mask of goop.  Is that beauty?  I think not.  Sure, I love playing with makeup and fashion but it's not because I feel like I need it to be pretty.  It's fun to put on makeup and a way to outlet my creativity.  Yes, it can enhance some awesome traits, but you have to start with your inside first.    Real beauty comes from loving who you are and what you look like, flaws and all.

For a blog that talks so much about beauty, we think it's time to talk about beauty of a different kind..... INNER BEAUTY!  This term is so clichéd that we may forget its importance and real meaning.  Inner beauty is the most important kind out there.  It's about being nice to even those who get on your nerves, caring when others are down, and above all loving yourself.

So let us introduce to you....... PROJECT FROSTED CUPCAKES, reminding everyone that no matter how much frosting you pile on, if you have to much salt in your batter, you'll never taste good.  In other words, no matter how much makeup you put on, if you are ugly on the inside, you will never truly be beautiful, because beauty starts on the inside.  Once you've mastered that, what you see in the mirror will be 1,000 times better.

Keep checking in with us for ways to improve your inner beauty and self esteem.

Love you lots!

-Two Girls Who Want To Make a Change

Thursday, May 5, 2011

Pink Lip Look

Lips are a great way to make a statement, no matter what you're trying to say.  This lip look (inspired by my sis) says, I don't know about you, but I'm lovin' spring! For this look, you only need three products:
1. Foundation
2. Lip Balm/ Base
3.Pink Lip Gloss (I used Clinique's Long Last Glosswear in Cabana Crush.)

Step 1. Apply a lip balm or lip base.
Step 2. Apply your every day foundation to your lips. (This might sound strange, but it works to make the pink shine and come through a lot better!)
Step 3. Swipe on the lip gloss.

This is the perfect touch to a simple makeup look.

Wednesday, May 4, 2011

Spring Hair

Hair is another thing that can add just a little more spring to your look.  Loose buns and braids are always fun, but I thought I would try a fishtail.  As you can see by my pics, you don't need to be an expert to make this look uber cute and full of spring.  A great way to preserve a flower just for the day to wear in your hair is to coat it in clear nail polish.  This will keep the petals from falling out or wilting quickly, while still letting it look real and fresh!  Leave some hair loose in the front, adding to the carefree look.

For those of you who are foreign to the art of fishtail braiding, here's how to get the look:
1: Gather all the hair going into the braid and split it into two equal parts.
 2: Take a chunk of hair from one side and cross it over to the other, joining it to the rest of the hair.
 3: Repeat, getting tighter and grabbing smaller chunks as you get further.
 4: Tie it at the end with a rubber band and pull hair that you didn't mean to be loose into a bobby pin or two.  Add a flower if you want. (Try the nail polish trick.)

Tuesday, May 3, 2011

Spring Nails

Spring is here and as we're nearing summer, the weather is getting warmer.  I thought today as the heat sunk into my skin that it was time to start showing it was spring through my outfits and accessories.  That included my nail polish.  For the fresh look I have in these pics, I used (from pinkie to pointer finger) Keep Off the Grass by OPI, A Grape Fit! also by OPI, Sexy Lady by China Glaze, and Japanese Koi (Neon) by China Glaze (my new fave!).  On my thumb, I have leftover Sally Hansen Salon Effects in a zebra print from a couple of weeks ago. (It actually stayed for that long!)  You can do what I did and put a different color on each nail and play it up with an animal print on the thumb, or you can just use one for your whole hand.  Add another splash of spring color with a plastic ring!  Keep checking in this week for fun spring fashion ideas!


Monday, May 2, 2011

Pulp Fashion

Here are a few of the dresses on display.
Yesterday, I happened to be in San Fransisco with my family and we decided to go see an exhibit that my grandmother had been talking about for a while.  This A-mazing exhibit was at the Legion of Honor in SF, titled Pulp Fashion.  In it, there were fantastic dresses starting from the 1600's, I believe, and through to the 1900's.  But this was what made them so extraordinary; They were all entirely made of paper!  Intricate gowns had been replicated from famous paintings into 3-D paper masterpieces.  The artist's name is Isabelle de Borchgrave.  There is also another exhibit at the Legion of Honor focusing on Spanish fashion.  Unfortunately, I didn't get to check that one out, so I can't really say much about it other than it does end July 4, 2011.  It is called Balenciaga and Spain.  I do, 100% recommend The Pulp Fashion to any age interested in clothing or fashion.  But get there soon, because it does end June 5, 2011!

Sunday, May 1, 2011

Welcome to my blog!

Hey girly girls!
I'm super excited to introduce FABB, my new blog!  Here, at FABB, I'm going to be sharing all of my must-haves for a fun life as a teen, including fashion and makeup secrets, reviews, baking and cosmetic recipes, great ways to stay healthy, and tips for loving who you are no matter what you see in the mirror.  Follow my posts for an adventure of my life and interests!