Showing posts with label Tutorials. Show all posts

Tuesday, March 6, 2012

Purple Look for Green Eyes

My friend Julia asked me yesterday if purple really made green eyes pop. When done correctly, you can make your eyes pop with any color, but purple in itself is known to help green eyes without much effort. If you guys like this, I can probably do looks and tips for different colored eyes. Just let me know! I ended up doing a dark smokey purple for this and I hope this answers your question, Julia!


If you look at a color wheel, red is the main complimenting color to a true green. I don't think you really want to go around with a red lid, but hey, what ever tickles you pink. So, other colors that go hand in hand with green are purples and peachy pinks. In person with this look, my eyes look super green and definitely pop more than they would with another color. Another thing to keep in mind, I went over my waterline and tightline with a black liner. That also added to the popping effect. This trick goes for all eye colors, not just green. I hope you found this helpful and let me know if you want to see more looks like this!

Products Used:
-Lime Crime Eyeshadow Helper
-Maybelline 24 hr. Color Tattoo in Painted Purple
-mark. Piccadilly e/s
-MAC Blackberry e/s
-Sleek Oh So Special palette (matte black)
-Wet 'n Wild Knock on Wood palette (pale pink highlight)
-NYX Studio Liquid Liner in Extreme Smokey Gray
-Clinique Naturally Glossy mascara
-Benefit Bad Gal Lash mascara
-Urban Decay 24/7 Glide On Pencil in Zero

Always,
Britta

Monday, January 16, 2012

Death of a Unicorn

Today I decided to do something a little more colorful with a dark twist. When I was finished, I ended up with this rainbow look, black in the crease. It wasn't difficult to do. You just need time, patience, and the will to do a lot of blending. While doing the rainbow colors, you don't want them to be just straight lines stacked next to each other. Blend, blend, blend!

What I used-
-BH Cosmetics 88 Standard Shimmer Palette
-matte black shadow from my Sleek palette
-NYX Jumbo Eye Pencil in Rocky Mountain Green, Baby Blue, and Purple
-Too Faced Shadow Insurance
-Benefit Bad Gal Lash

Always,
Britta

Thursday, December 22, 2011

My Christmas Eye Look

I thought I would do a simple and festive look for the upcoming holiday weekend (which I feel couldn't come any slower). I looooove Christmas and anything to do with the holiday season. The decorations, food, and most importantly, the shopping. I'm heading off to San Fran tomorrow to experience some really big trees, lots of lights, and extremely last-minute shopping. Expect some pictures from that excursion. To get into the mood before I head of to the city, here is a fun glittery eye look...


Products Used (in order used)-
-Too Faced Shadow Insurance
-MAC Paintpot in Rubenesque
-BH Cosmetics 88 Standard Shimmer Palette
-MAC Cranberry
-Sleek Oh So Special Palette (matte brown)
-Maybelline Eye Studio Gel Liner in Blackest Black
-Urban Decay 24/7 Pencil in Zero
-Lit Cosmetics Glitter in Cowgirl w/ Lit Clearly Liquid Glitter Base
-mark. Scanda-Lash Mascara in Black-Lash

Pair this with a bold red lip and you're good to go for any holiday party or dinner you may have this week. Or tone it down with a neutral lippie.

Always,
Britta

Wednesday, December 7, 2011

Nicki Minaj Inspired

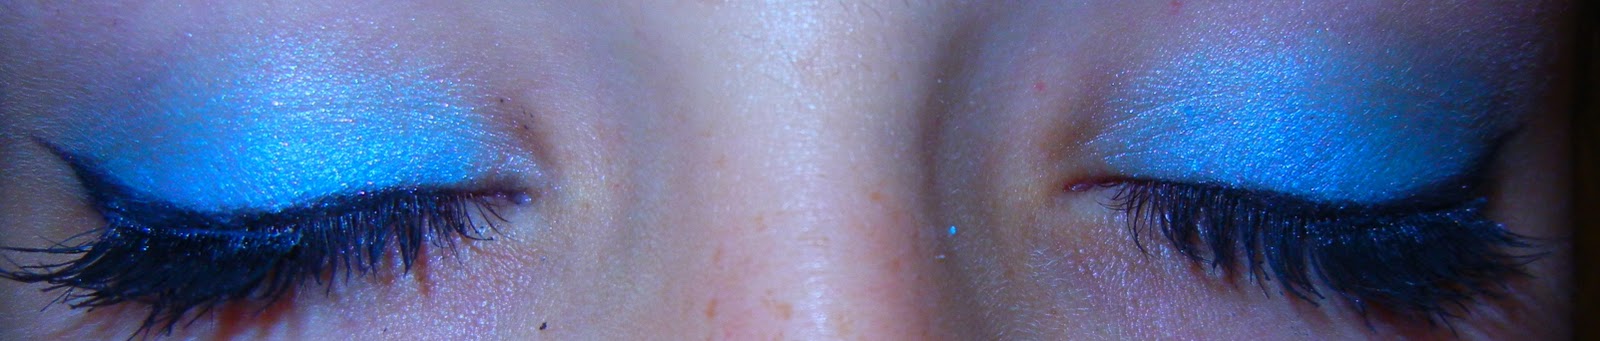
A while ago at the VMA's, Nicki Minaj was wearing a baby blue eye look with black winged liner, big lashes in the outer corners, and bubble gum pink lips. I've seen her wearing it since then, so I thought it would make a cute post.

Step 1: Prime your eyes.

Step 2: Apply a sticky blue base. (I used NYX Jumbo Eye Pencil in Baby Blue)

Step 3: Go over with a baby blue shadow and a tad bit of a teal.

Step 4: Soften up the crease with a shadow one shade darker than your skin.

Step 5: Wing your black eyeliner on top.

Step 6: Go over your waterline with a white liner.

Step 7: Put on false lashes along with your mascara. (optional)

Step 8: Nicki wore a bubblegum pink lip with this. You can if you want to.


For the lips, I used my Sleek Pout Paints.

Have fun with this look and go crazy like Nicki!

Always,
Britta

Tuesday, November 29, 2011

Feelin' in a Peacock Kinda Mood

This weekend was just a peacock weekend for me. I guess I just felt a burst of bird energy. Vintageortacky's Cora had done a peacock mask look during Halloween and I thought I would try it out. The next day, I did a much simpler look using the same colors. Since I did them within days of each other, I thought I would put them into one post. So, here it is!

Please ignore the untamed eyebrows. I wasn't planning on posting this until now. Inspiration by Vintageortacky.

My other peacock interpretation. Products that I used: Too Faced Shadow Insurance, NYX Jumbo Pencil in Rocky Mountain Green, Urban Decay 24/7 in Zero, MAC False Lashes Mascara, BH Cosmetics 88 Color Standard Shimmer Palette.
Always,
Britta

Sunday, November 20, 2011

Smokey Bronze

A few days ago I decided to do an inspired look by a magazine cover. That didn't work out too well, so I transformed it into this. It's a more daring look that isn't super dark. I didn't use very many products which makes it a lot easier to achieve on your own. Of course, don't go out and buy it because I used it. Use what you have and make it your own. Now, onto the pictures!


Products Used:
-Makeup Forever Aqua Cream in #12
-Sleek Oh So Special (my favorite palette in the whole, wide world!)
-Random brown drugstore liner
-mark. scanda-lash mascara

I have some tutorials planned for next week, so keep checking in! I hope you guys have a fantabulous weekend!

Always,
Britta

Monday, October 17, 2011

Halloween Fairy

Here is a fairy look for Halloween that is easy to do and fun to play around with. You can pair it with a high bun and ribbon or long loose curls and a cute frock.

What I used.....
-Too Faced Shadow Insurance
-BH Cosmetics 88 Standard Shimmer Palette
- Sleek Oh So Special Palette
-Lit Cosmetics Glitter in Pink Flamingo and Purple Rain (with the adhesive)
-MAC False Lashes Mascara
-white eye liner
-NYX Jumbo Pencil in Purple

Step 1: Prime your lids.

Step 2: Apply the bright peach color from the Sleek palette. (Not sure on the name.)
Step 3: Apply the NYX pencil all around the crease and under the lash line.

Step 4: I used a true purple color from my BH palette over the pencil.
Step 5: In the deep crease, I used a darker purple for some more dimension.

Step 6: Blend the outsides and soften it out with a hot pink shadow.
Step 7: Apply Pink Flamingo glitter from Lit with their adhesive all over the lid and Purple Rain on the inner corner.

Step 8: Use a white eyeliner in the waterline.

Step 9: Add mascara or even false lashes if you want.
And there you have your fairy makeup laden with fun glitter! I loved playing with these glitters and can see myself using them in more tutorials! Keep a look out for some more Halloween fun.

Always,
Britta

Saturday, October 8, 2011

Spider Eyes

Here is a cute creepy crawly look I created for Halloween using just a tad bit of my new Lit Cosmetics Glitter! This look is good if you are going to a Halloween party and don't have a set costume, but need to dress up a little. Here's what I used.....

-Too Faced Shadow Insurance
-Lit Cosmetics Glitter in Roxy Rolla and glitter base
-Wet n' Wild Coloricon Pencil in Black Black
-Sleek Noir shadow
-Urban Decay 24/7 Glide on Pencil in Zero
-Bad Gal Lash Mascara

Step 1: Apply the Wet n' Wild pencil on the lid.

Step 2: Go over that in Noir from Sleek or any other matte black shadow.

Step 3: Using the Wet n' Wild pencil again, draw four legs on each eye.
Step 4: Then draw on the web, then go over that and the legs with Noir.
Step 5: Add two dots of the glitter on the inner corners for the eyes.

Step 6: Apply the Urban Decay pencil in the waterline and tightline. Add mascara.
Wah-lah! You're now ready for your Halloween party or Trick-or-Treating! I hope this helped. Remember, you can use any products similar to those used that you may have. No need for going out and buying them just for this if you already have something that will do the job.

Always,
Britta

Monday, September 26, 2011

Halloween Series: Cleopatra Eyes

To start off this Halloween makeup series, I thought I would do a Cleopatra look because I know that can be a popular costume. (Coming from a girl who was her two years ago.) This may seem super early to be starting Halloween tutorials, but I thought some of these may give a few of you some inspirations who aren't quite sure what character they will be portraying on October 31st! If you think about it, most people have their costume idea by the beginning of October anyway. I think there are many different ways of portraying this eye look, so here is one of them!

What you'll need.....
-eye primer
-MAC Paintpot in Rubenesque
-burnt golden eye shadow
-gel liner
-black shadow
-mascara
-liquid liner

Here's one way to achieve this look.....

Step 1- Apply a primer all over the lid.

Step 2- Apply MAC Paintpot in Rubenesque just up to your crease.
Step 3- Go over that in a burnt golden eye shadow.
Step 4- Apply your black gel liner with a simple liner brush as shown below. (It's ok if it's a bit shaky. You're going to clean it up with a shadow next.)
Step 5- Go over the gel liner with a black shadow. I used Noir from my Sleek palette.

Step 6- Using your gel liner, create the straight line below. For the curlicue, it might be easier to use the liquid liner or a thin pointed liner brush. Apply mascara.

And there you have your Cleopatra look! As I said before, there are many different ways of doing this. You can do exactly what I did here or you could even take snippets of this and make it your own! Have fun and I will have more Halloween makeup up after this!

P.S.- For any Halloween makeup requests, comment below!

Always,
Britta

Saturday, September 24, 2011

Sara Bareilles- Gonna Get Over You Video Makeup

Sara just came out with a new video a couple of days ago to her song, Gonna Get Over You. It's a really fun, upbeat, and colorful video with lots of cheesy, feel-good dancing. I loved how she had her hair, big pouf in the front and a tight pony in the back. So, I thought I would do a tutorial on the makeup along with pics of my attempted hair creation. I can already tell it's going to be really difficult to get all the knots out.

What I used:
-Sleek Oh So Special palette
-Too Faced Shadow Insurance
-Urban Decay 24/7 Glide On Pencil in Zero
-Bad Gal Lash mascara


Step 1: Apply your primer all over your lid.

Step 2: Using Noir (the black) from the Sleek palette, go over the lid with a slightly winged corner.
Step 3: Go over the lid and a little bit up more with Glitz from the Sleek palette.
Step 4: Blend Boxed from the palette into the crease.
Step 4: Go into the waterline and upper lashline with the Urban Decay pencil or any other black liner you may have.

Step 5: On the bottom lashline, apply a bit of Sleek's Noir.

Step 6: Curl your lashes and coat them with your favorite voluminous mascara.

  Hope you enjoyed this inspired look and I will see you back next time with a much anticipated (by me at least) Halloween tutorial!

P.S.- Don't forget to take the poll at the right!

Always,
Britta

Sunday, September 18, 2011

Autumn Eyes

Here is a fall look that I threw together using a couple things I got at Sephora. I love the gold and brown together for these coming cooler seasons and think anyone can work it!

What I used.....
-Too Faced Shadow Insurance
-Makeup Forever Aqua Cream in 12
-Urban Decay 24/7 Glide-On Eye Pencil in Zero
- Benefit Bad Gal Lash mascara
-Boxed from Sleek palette

Step 1- Apply a primer all over your lid.

Step 2- On the lid, place the aqua cream in 12, which is a goldy copper color.

Step 3- In the crease, I used Boxed from my Sleek Oh So Special palette.

Step 4- Next, I used the Urban Decay pencil in Zero on my waterline and tightline.

Step 5- Apply mascara!


This look is really simple and fun to play with! You can substitute products for similar ones you may have to make your own version!

Always,
Britta

Sunday, September 4, 2011

Promised Lip Look Inspired by Cora

As I promised, here is the lip look Cora did along with her how to rock and orange lip video. There are no words to describe how beautiful this is. The technique may sound odd, but the end product is beyond fantabulous!

video by Cora (my inspiration)- click here

My interpretation:

Step 1: Apply your orange lip stick all over your lips.

Step 2: Make a small O shape with your mouth as shown below.

Step 3: Take a small blending brush with some burnt gold colored eyeshadow and sweep it in circles.
finished look
I love this look! Thank you so much Cora for being such and inspiration and first one to get me interested in makeup! Check out her videos starting with the one linked above.

Always,
Britta

Sunday, August 28, 2011

Sleek Oh So Special Natural Eye Look

Here is the other eye look I promised you guys using my new Oh So Special palette from Sleek. It's a natural eye look with a small winged out liner which is going to be really big this coming season. I loved creating this look and hope you like it just as much as I do! What I used......

-Too Faced Shadow Insurance
- Sleek Oh So Special palette
- Maybelline Eye Studio Gel Liner in Blackest Black
- MAC Powerpoint Eye Pencil in Engraved
- MAC False Lashes Mascara in False Black (to read a quick review on this click here)

Here's how to achieve this look.....

Step 1- Prime your entire eyelid.

Step 2- Apply Organza from the Sleek palette all over the lid.
Step 3- In the crease and angling down to the outer corner of the lash line, apply Boxed from the Sleek palette.
Step 4- Using the gel liner, create a small winged liner.
Step 4- On the inner corner of the eye using the gel liner, create a point to add a bit of intensity.
Step 5- Go into the waterline with MAC's Powerpoint Pencil in Engraved.
Step 6- Add mascara.
Here's what it should look like when you're all finished:

I love how intense and almost bird-like the liner when your eyes are open and so natural and subtle when closed. It's like a POW! every time you open. As always, you don't need to go out and buy the exact products I used. Match similar ones that you already have to create your own spin on it!

Always,
Britta